Connect with us

Published

on

How to change php version in htaccess in server

If you want to update the PHP version applicable to your hosting account as a whole, you can do it directly in hPanel.

In case you’d like to change the PHP version for only one of your domains, subdomains, or a subfolder inside any of these, you can do so by adding a line of code on the .htaccess file:

Step 1 – Open Your .htaccess File

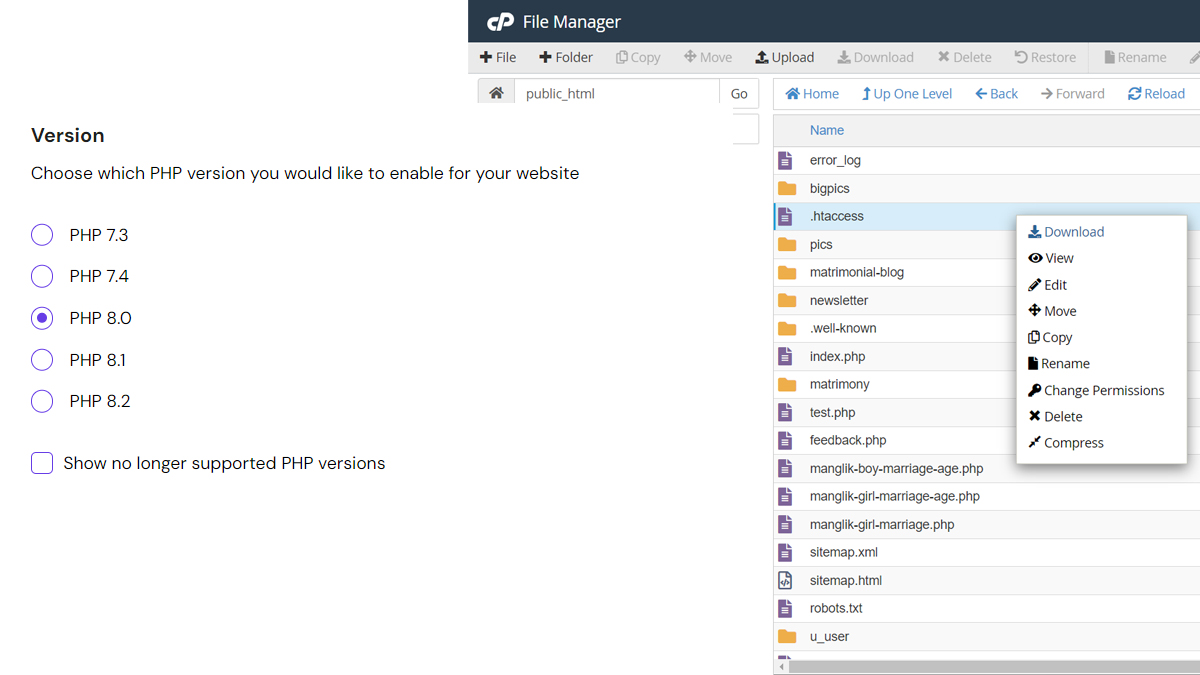
Go to Websites → Manage, search for File Manager on the sidebar and click on it:

Then, access the folder to which you would like to apply a different PHP version. If you want to edit a domain, access its public_html folder. For a subdomain, the corresponding folder will be inside the domain’s public_html folder:

For a specific folder, go to the desired folder’s path. Once in the correct location, open the .htaccess file by double-clicking on it.

If the file doesn’t exist, you can create it directly in the File Manager. Make sure to include a dot (.) at the beginning of the filename!

Step 2 – Edit the .htaccess File

Add the following code to your .htaccess file (at the very beginning of it):

<FilesMatch "\.(php4|php5|php3|php2|php|phtml)$">
SetHandler application/x-lsphp71
</FilesMatch>

The second line will define the PHP version for the folder. All you need to do is change application/x-lsphp71 code for the version that you would like to use. Check this table for the possible values:

PHP versionCode
5.2application/x-lsphp52
5.3application/x-lsphp53
5.4application/x-lsphp54
5.5application/x-lsphp55
5.6application/x-lsphp56
7.0application/x-lsphp70
7.1application/x-lsphp71
7.2application/x-lsphp72
7.3*application/x-lsphp73
7.4application/x-lsphp74
8.0application/x-lsphp80
8.1application/x-lsphp81

*PHP versions prior to this one are currently considered outdated and are no longer supported.

PHP version

PHP version you would like to enable for your website

  • PHP 5.2
  • PHP 5.3
  • PHP 5.4
  • PHP 5.5
  • PHP 5.6
  • PHP 7.0
  • PHP 7.1
  • PHP 7.2
  • PHP 7.3
  • PHP 7.4
  • PHP 8.0
  • PHP 8.1
  • PHP 8.2

To switch to PHP 4.4:

AddHandler application/x-httpd-php4 .php

To switch to PHP 5.0:

AddHandler application/x-httpd-php5 .php

To switch to PHP 5.1:

AddHandler application/x-httpd-php51 .php

To switch to PHP 5.2:

AddHandler application/x-httpd-php52 .php

To switch to PHP 5.3:

AddHandler application/x-httpd-php53 .php

To switch to PHP 5.4:

AddHandler application/x-httpd-php54 .php

To switch to PHP 5.5:

AddHandler application/x-httpd-php55 .php

To switch to PHP 5.6:

AddHandler application/x-httpd-php56 .php

To switch to PHP 7:

AddHandler application/x-httpd-php7 .php

To switch to PHP 7.1:

AddHandler application/x-httpd-php71 .php

Continue Reading

Tech

Top 3 Ways to Create a Group in WhatsApp

Learn how to create a group in WhatsApp using the WhatsApp application, WhatsApp Web, or the WhatsApp Business app. Follow these step-by-step instructions to easily create a group and start communicating with multiple people at once. Whether you want to create a group for personal or business purposes, WhatsApp provides multiple options to suit your needs. Stay connected with your friends, family, or colleagues by creating your own WhatsApp group today.

Published

on

Top 3 Ways to Create a Group in WhatsApp

Top 3 Ways to Create a Group in WhatsApp

Introduction

WhatsApp is a popular messaging app that allows users to send text messages, make voice and video calls, and share media files. One of the key features of WhatsApp is the ability to create groups, which allows users to communicate with multiple people at once. In this article, we will discuss the top 3 ways to create a group in WhatsApp.

Method 1: Using the WhatsApp Application

The easiest way to create a group in WhatsApp is to use the WhatsApp application on your smartphone. Here’s how:

  1. Open the WhatsApp application on your smartphone.
  2. Tap on the “Chats” tab at the bottom of the screen.
  3. Tap on the “New Group” button at the top right corner of the screen.
  4. Select the contacts you want to add to the group by tapping on their names.
  5. Tap on the green checkmark button at the bottom right corner of the screen.
  6. Enter a name for the group and optionally add a group icon.
  7. Tap on the green checkmark button again to create the group.

That’s it! You have successfully created a group in WhatsApp using the WhatsApp application on your smartphone.

Method 2: Using the WhatsApp Web

If you prefer to use WhatsApp on your computer, you can create a group using the WhatsApp Web interface. Here’s how:

  1. Open the WhatsApp Web interface on your computer by visiting web.whatsapp.com.
  2. Scan the QR code on the screen using the WhatsApp application on your smartphone.
  3. Once you are logged in, click on the three-dot menu icon at the top left corner of the screen.
  4. Select “New Group” from the menu.
  5. Select the contacts you want to add to the group by clicking on their names.
  6. Click on the green checkmark button at the bottom right corner of the screen.
  7. Enter a name for the group and optionally add a group icon.
  8. Click on the green checkmark button again to create the group.

Now you have successfully created a group in WhatsApp using the WhatsApp Web interface on your computer.

Method 3: Using the WhatsApp Business App

If you are a business owner and want to create a group for your business, you can use the WhatsApp Business app. Here’s how:

  1. Download and install the WhatsApp Business app on your smartphone.
  2. Open the WhatsApp Business app and verify your phone number.
  3. Tap on the three-dot menu icon at the top right corner of the screen.
  4. Select “New Group” from the menu.
  5. Select the contacts you want to add to the group by tapping on their names.
  6. Tap on the green checkmark button at the bottom right corner of the screen.
  7. Enter a name for the group and optionally add a group icon.
  8. Tap on the green checkmark button again to create the group.

Congratulations! You have successfully created a group in WhatsApp using the WhatsApp Business app.

Conclusion

Creating a group in WhatsApp is a simple process that can be done using the WhatsApp application, WhatsApp Web, or the WhatsApp Business app. Whether you want to create a group for personal or business purposes, WhatsApp provides multiple options to suit your needs. So go ahead and create your own WhatsApp group to stay connected with your friends, family, or colleagues.

Continue Reading

Tech

How to Use WhatsApp

Learn how to use WhatsApp, a popular messaging app that allows you to send text messages, make voice and video calls, and share media with friends and family. This guide will walk you through the basics of creating an account, adding contacts, sending messages, making voice and video calls, managing settings and privacy, creating and joining groups, backing up and restoring your chats, and using WhatsApp Web on your computer. Stay connected with your loved ones using the features offered by WhatsApp.

Published

on

How to Use WhatsApp

How to Use WhatsApp

WhatsApp is a popular messaging app that allows you to send text messages, make voice and video calls, and share media with friends and family. Whether you’re new to WhatsApp or just want to brush up on your skills, this guide will walk you through the basics of using WhatsApp.

Create an Account

To get started with WhatsApp, you’ll need to download the app from the App Store or Google Play Store and create an account. Once you’ve installed the app, open it and follow the on-screen instructions to verify your phone number and set up your profile.

Add Contacts

Once you have an account, you can start adding contacts to your WhatsApp. To do this, tap on the “Chats” tab at the bottom of the screen, then tap on the new chat icon in the top right corner. You can then search for contacts by typing their name or phone number in the search bar. Once you’ve found the contact you want to add, tap on their name and then tap on the “Add to Contacts” button.

Send Messages

To send a message on WhatsApp, open the app and tap on the “Chats” tab. Then, tap on the new chat icon and select the contact you want to message. Type your message in the text box at the bottom of the screen and tap the send button. You can also send photos, videos, and documents by tapping on the attachment icon next to the text box.

Make Voice and Video Calls

WhatsApp allows you to make voice and video calls to your contacts. To make a voice call, open the app and go to the “Chats” tab. Tap on the new chat icon and select the contact you want to call. Then, tap on the phone icon in the top right corner and select “Voice Call.” To make a video call, follow the same steps but select “Video Call” instead.

Manage Settings and Privacy

WhatsApp offers a range of settings and privacy options that you can customize to suit your needs. To access these settings, tap on the three-dot menu icon in the top right corner of the app and select “Settings.” From here, you can adjust options such as your profile photo, status, privacy settings, and notification preferences.

Create and Join Groups

WhatsApp allows you to create and join groups with your contacts. To create a group, open the app and go to the “Chats” tab. Tap on the new chat icon and select “New Group.” Then, add the contacts you want to include in the group and give it a name. To join a group, you’ll need to receive an invitation link from a group admin.

Backup and Restore Your Chats

To backup your WhatsApp chats, go to “Settings” and tap on “Chats.” From there, select “Chat backup” and choose how often you want to back up your chats. You can also choose whether to include videos in the backup. To restore your chats, simply reinstall WhatsApp and follow the on-screen instructions to restore your backup.

WhatsApp Web

If you prefer to use WhatsApp on your computer, you can use WhatsApp Web. To do this, open a web browser and go to web.whatsapp.com. Then, open WhatsApp on your phone and tap on the three-dot menu icon. Select “WhatsApp Web” and scan the QR code on your computer screen. You can now use WhatsApp on your computer.

With these basic tips, you’ll be able to navigate WhatsApp and stay connected with your friends and family. Whether you’re sending messages, making calls, or joining groups, WhatsApp has a range of features to enhance your communication experience.

Continue Reading

Tech

How to Use WhatsApp on Your Laptop

Learn how to use WhatsApp on your laptop or desktop computer with this step-by-step guide. Whether you prefer using WhatsApp Web or the desktop app, both methods allow you to stay connected with friends and family seamlessly. Enhance your messaging experience by typing messages more quickly, viewing photos and videos on a larger screen, and easily sharing files from your computer. Stay connected and productive with WhatsApp on your laptop.

Published

on

How to Use WhatsApp on Your Laptop

How to Use WhatsApp on Your Laptop

In today’s digital age, staying connected with friends and family has become easier than ever. One of the most popular messaging apps, WhatsApp, allows users to send messages, make calls, and share media files effortlessly. While WhatsApp is primarily designed for mobile devices, you can also use it on your laptop or desktop computer. In this article, we will guide you through the process of using WhatsApp on your laptop.

Method 1: WhatsApp Web

WhatsApp Web is a feature that allows you to access your WhatsApp account on your computer. Follow these steps to get started:

  1. Open your preferred web browser on your laptop.
  2. Visit the WhatsApp Web website by typing in the URL: web.whatsapp.com.
  3. On your mobile device, open WhatsApp and tap on the three dots in the top right corner.
  4. Select “WhatsApp Web” from the menu.
  5. A QR code scanner will appear on your mobile screen.
  6. Scan the QR code displayed on the WhatsApp Web website using your mobile device’s camera.
  7. Once the QR code is scanned, your WhatsApp account will be mirrored on your laptop, and you can start using WhatsApp on your computer.

Method 2: WhatsApp Desktop App

If you prefer using a dedicated desktop application rather than a web browser, WhatsApp also offers a desktop app for Windows and Mac. Here’s how to use it:

  1. Go to the WhatsApp download page on your laptop.
  2. Click on the “Download” button to download the WhatsApp desktop app for your operating system.
  3. Once the download is complete, open the installer and follow the on-screen instructions to install the app.
  4. After installation, launch the WhatsApp desktop app.
  5. On your mobile device, open WhatsApp and tap on the three dots in the top right corner.
  6. Select “WhatsApp Web” from the menu.
  7. Scan the QR code displayed on the WhatsApp desktop app using your mobile device’s camera.
  8. Once the QR code is scanned, your WhatsApp account will be synced with the desktop app, and you can start using WhatsApp on your laptop.

Features and Limitations

Using WhatsApp on your laptop offers several advantages. You can type messages more quickly using a physical keyboard, view photos and videos on a larger screen, and easily share files from your computer. Additionally, you can receive notifications and reply to messages without having to pick up your phone.

However, it’s important to note that WhatsApp on your laptop is an extension of your mobile account. This means that your phone needs to be connected to the internet for WhatsApp to work on your laptop. Also, you won’t be able to make or receive calls through WhatsApp on your laptop; it is limited to messaging and file sharing.

Conclusion

Using WhatsApp on your laptop can greatly enhance your messaging experience, allowing you to stay connected with your contacts seamlessly. Whether you choose to use WhatsApp Web or the desktop app, both methods provide a convenient way to use WhatsApp on a larger screen.

So, next time you’re working on your laptop and don’t want to switch back and forth between devices, give WhatsApp on your laptop a try. Stay connected, stay productive!

Continue Reading

Trending